
In most cases, the factor that most influences the duration of a tip is the working temperature.
Before the ROHS regulation (Restriction Of Hazardous Substances) came into effect on the 1st July 2006, solder wire that contained lead was permitted. After this date the use of lead was prohibited (as well as other substances) in all equipment and processes except the following: medical apparatus, monitoring and surveillance equipment, measuring instruments and equipment specifically designed for the military and space industry as well the car sector (car control systems, airbags, etc.), rail transport, etc.
The special characteristic of the most common lead alloys is that the fusion occurs at around 180°C. With the most common lead-free alloys this happen approximately at 220°C. So the difference of 40°C meant it was necessary to increase the temperature of the solder tool to achieve a solder joint in the same length of time (if soldering time is increased, then the components and the printed circuits may be damaged) and this reduced the life of the tips and increased oxidation.
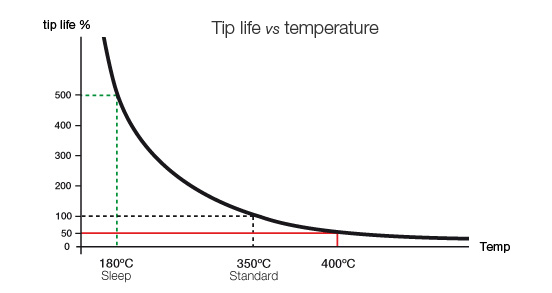
The following graph shows the effect when you increase the tip temperature. Taking 350°C as a reference, increasing the working temperature by 50°C to 400°C will reduce the life of a tip by half. The increase in tip temperature means an exponential reduction in the life of a tip (Ahrrenius).
The usual working temperature for lead-free tin alloys is 350°C. With SMD 01005-sized components you can work at 300°C because of their reduced size.
The importance of the accuracy
You should periodically check the working temperature not only to increase the life of tips but also to avoid overheating and soldering with low temperatures.
Both can contribute to problems while soldering:
- Overheating: many trained solder technicians believe that if the solder doesn’t melt quickly, then they must increase the soldering iron temperature to compensate. Increasing it can cause localized overheating of the connection area and result in lifted lands, overheated solder, board damage, poor solder joints, an increase in oxidation and erosion of the tip’s surface plating…
- Lower than expected temperatures may lead to longer dwell times and poor heat transfer, resulting in decreased productivity and poor quality solder connections.
So for a good performance, accurate temperature readings are essential.
How can you read it?
Soldering tip temperature accuracy can be measured with different equipment. JBC offers the following ways to measure tip temperature:
- TIA-A Thermometer: This is a practical thermometer which gives an accurate reading of tip temperature by means of the STA-A sensor (Type E Thermocouple). It also reads it in sleep mode. When you are measuring, it is necessary to apply solder to the center of the sensor where it is a reinforced to ensure its durability.
- TID-A Digital Thermometer: This high precision thermometer provides quick response readings. It only works with the STD-A Sensor (Type K Thermocouple). Using the digital display you can easily change the temperature scale (°C/°F). It also provides Special Features such as Min/Max value memory, Offset or Scale adjustment and Hold function which retains the current measurement.
- PH218 Thermocouple Type K: it reads the temperature at a specific point on the PCB. It helps you manage the profiles when used with the Preheaters. We recommend to use Kapton tape to fix the thermocouple securely to the PCB.
How to maintain the correct temperature?
Once you have started soldering you must always remember to keep your working temperature low to avoid the flux burning and producing poor quality solder joints and even making them fragile.
If you see that the solder does not melt fast enough you will be inclined to choose a higher temperature which must be avoided. Instead what you must do is choose a larger tip with greater surface contact.
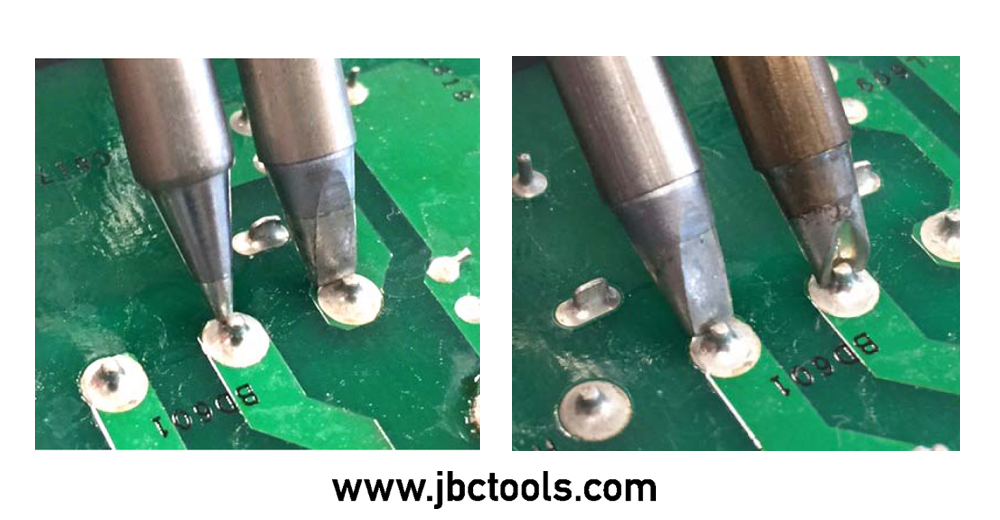
These photographs show the difference in surface contact between tips. In the first one you can see an incorrectly selected tip on the left and a correctly selected tip on the right. The small surface contact of the tip (left) means a slow heat transfer. Then you will have to increase the temperature to unadvisable levels of 450°C to finish the soldering in a specific time.
Moreover, JBC develops geometries that increase the heat transfer besides a simple selection of size of common tips such as conical or chisel. In the second photograph you can see how the grooved tip adapts perfectly to pin and pad maximizing the thermal transfer.
It’s important to use the correct size tip for the job in hand, Metcal recommends one that is about the same size as the object being soldered, to avoid damage.
Hello!
As you know, the bigger the solder tip, the better the thermal transfer. You should select the biggest tip possible for your application. This way you will be able to:
– Work at lower temperatures (350ºC).
– Obtain faster results in less time.
– Improve thermal performance.
– Increase temperature precision.
– Reduce collateral damage (thermal stress on components and PCBs).
Thanks for your comment!
This is the exact blog that I am looking for. Thanks for sharing the information.